
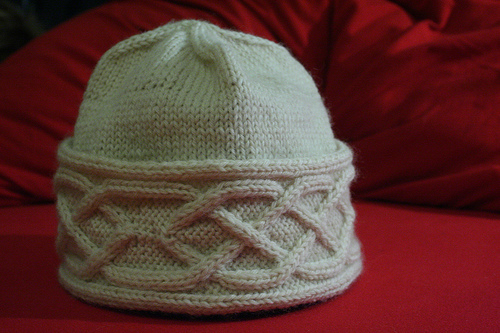
Carrick Bend Cap
 This cap was created for a special pirate that emailed us and wanted something nautical and subtle that would speak to those in the know. She wanted the carrick bend knit into a cap. She'd scoured the seven seas and the far corners of the internet and hadn't found such a thing and she knew being like minded types we'd help her out. It only took about a year but after much sweating and straining we managed to devise a way to knit a cap that shows off the carrick bend. It's a great way to show off your seafaring ways on the streets and keep your piratical nature visible but subtle. After all there's nothing subtle about wearing a tricorn on the streets! Not to mention a fine looking addition to your shore going rig.
What's a carrick bend? It's a bend (aka knot for the more lubberly) that is used to tie two lines together. It's especially good at joining lines of different sizes and heavy lines. It doesn't bind, and is sturdy when capsized. All in all a truly excellent bend.
Carrick Bend Cap Complete Pattern in .pdf is here.
Gauge:
Carrick Bend Cap Chart Only in .pdf is here.
Sizes: 21 (23) inches. This pattern does not include a lot of negative ease, because the thickness of folding the brim up provides the negative ease required.
Needles: Size 8 (5mm) 16" Circular or DPNs also a cable needle or stray DPN
Yarn: Worsted Wool. We used Fisherman's Wool from Lion Brand. Approximately 4 ounces (100g) Any yarn that shows cables well and can hit the gauge should be fine.
Specialized Techinques: For this pattern we've used some specialized increases, decreases and cable crossings. None of them are hard. They're just a hair unique. The traveling stitches for knots were strongly inspired by Elisabeth Lavold and her absolutely fascinating book Viking Patterns for Knitting.
Cable Crosses:
C4L - Cable 4 Left: put next 2 stitches on cable needle at front of work, knit 2, knit the 2 from the cable needle.
C4R - Cable 4 Right: put next 2 stitches on cable needle at back of work, knit 2, knit the 2 from the cable needle.
C4LoP - Cable 4 Left over Purls: put next 2 stitches on cable needle at front of work, purl 2, knit the 2 from the cable needle.
C4RoP - Cable 4 Right over Purls: put next 2 stitches on cable needle at back of work, knit 2, purl the 2 from the cable needle.
Bobble increase: Work five stitches in one stich. Purl the first stich, then knit through the back of the loop then knit through the front of the loop, then knit through the back of the loop then knit through the front of the loop. You can now drop the loop.
Grafting in pattern: To close the cabled band you should graft (kitchner) the two ends of the band together. This will provide a seamless looking band. This is most easily achieved if you have a bit of waste yarn selvege on each end. Here is our tutorial. It's also listed under the techniques menu.
Using waste yarn cast on 26 stitches using a provisional cast on.
Knit rows 1 and 2 of the chart twice in waste yarn.
Change to working yarn, and begin knitting hat band.
- Work all 40 rows of the chart.
- Then knit rows 39 and 40 again 2 (3) times. This will create a space between the knots.
- Repeat steps 1 and 2 two more times. Knit the chart and spacer a total of 3 times
- Leave a tail about 2-3ft long and cut working yarn.
- Knit rows 39 and 40 two more times in waste yarn
Remove waste yarn.
Weave all ends.
Body
With the wrong side of the band facing out, pick up 3 of every 4 stitches along the edge of the hat band.
Join and purl one round.
Knit 6.5(7) inches of stockinette stitch. Continue to crown.
Crown
Place markers dividing the stitches evenly.
Knit to three stitches before the marker ssk, k1, slip marker, k1, k2tog. Repeat for every marker on the round.
Repeat previous round until you have 24 stitches remaining. When it become difficult to knit on circular needles you may have to switch to double pointed needles.
K2tog all the way around (12sts remaining)
Cut a tail about 18" long.
Thread remaining 12 stitches onto tail with yarn needle. Run the tail through the stitches a second time.
Carefully tighten down the tail pulling hte first loop tight and then the second.
Put end through to the inside and weave all your ends.
Block the hat.
Note: the Lion Brand Fisherman's wool wants to felt. It feels felting is its destiny. Be careful never to wash your hat in hot water, or you may end up with something suitable for a preschooler.

Carrick Bend Cap Pattern by Laura Thomas & Heidi Waterhouse is licensed under a Creative Commons Attribution 3.0 United States License.
